

Saturday, August 22, 2009
Wednesday, August 19, 2009
MAKING FILLER FLOWERS WITH NYLON RIBBONS


This is a very interesting and easy to do craft.You can use this as fillers for your artificial flowers or this by itself can make a nice table arrangement if you do it more with different colours.
How to do:
Take 1mt of nylon ribbon of any colour.The edges will be stitched,cut any one of the edge and slowly remove the threads lengthwise.Do like this for the 3/4th of the ribbon(the remaining part we will use it for sticking).Now apply little fevicol in the edge of the ribbon and stick it to the broom stick,and then hold the ribbon in the left hand and slowly rotate the stick with your rigth hand.While finishing put some fevicol and stick it.That's it,your filler flower is ready.
Tuesday, August 18, 2009
HOW TO DO LEAF PAINTING
I have done these leaf painting long back.Its very interesting craft but a difficult one to maintain.I dont have all those things now.This is from the net,hope it will be usefull for you all.

Painting on Peepal leaf is a delicate work of art originated in the southern India (Kerala). Its done on dry Peepal leaves. Its one of the oldest form of art, which shows the ingeniousness & patience of the artists. This art form originated because the leaves of the peepal tree have a beautiful shape as they taper to a needle point. Though now only a few artists are left who practice this leaf art.
Themes of painting
Typically themes are painted on peepal leaves are:
• Religious Indian figures
• Animals
• Scenery
• But we can experiment with modern an abstract art also .
Material required
Its very inexpensive all you need is:
• Peepal Leaves
• Oil paints
• Sheet for the background
Method
The method is divided into 2 process
1. Drying the leaves
2. Painting on leaves
…….For drying Peepal leaves
Place a few leaves in a bowl full of water for15 days or a month . But do remember to check it once every few days to see the condition of the leaves. The purpose of soaking the leaves is to remove the outer layer of the leaves. After being in water for long, the leaves get a film over them, which you need to clean by washing it off or use a brush periodically. And do remember to change the water with a fresh one periodically Once the outer skin is lost, it leaves behind a beautiful bony structure, usually off-white in color.
Now dry it for a day & you got a leaf to paint on.
………For Painting the leaves
Step 1
Use oil paints to paint your favourite design on the peepal leaves
Step 2
Put a coloured sheet for background. Use a colour that will enhance the effect of the painting. The background is usually kept because Peepal leaves are very fragile and may rupture.
Tips and tricks• The most important tip is to be patient while drying peepal leaves and handle them delicately.
• You can also paint the peepal leaf in two colours. To give it a different half and half look.
• Use Golden colour to make a border. You can also use golden colour for highlighting or making jewelery.
• Add glitter to enhance the look of your painting
• Mix and match various mediums. For eg. You can make Ganeshji of clay and stick on the peepal leaves
• If Painting is not your cup of tree then dip these dry peepal leaves in bright , vibrant water colours and then dry it. It will give beautiful look
• Many wedding cards are decorated with dry peepal leaf .You can also use these
• Cover with transparent sheet to protect your work
Similar to the above lotus leaves even peepal leaves can be painted with vibrant colours
So just start just start and make your own creative piece of art on peepal leaf.
NOTES:
This tutorials belongs to
www.pepalleaf.blogspot.com
Monday, August 17, 2009
HOW TO MAKE SOLAR WOOD FLOWER BASKET
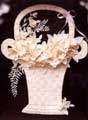 Sola wood is a naturally obtained material. It is Tapioca peel, treated for craft purpose with which variety of things can be made. It is available in the shops where craft materials are sold. Here we are making a flower basket, a very attractive piece of art.
Materials Used
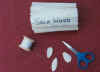 Sola wood - about 20 rolls
- Thermocol - 1/2 meter
- Hard Board -2 1/2 meters
- Cloth - Cotton/Satin/Felt/ Velvet
- Glue ( Fevicol)
- Flower Making thread
- Scissors, carbon, tracing, design, cutter

First choose the design you want to work.
- Trace the design onto the thermocol using tracing paper and carbon paper.
- Draw the outline of the basket on the thermocol using a pen or pencil.
- With a thermocol cutter cut the thermocol through the outline carefully.
- Once the cutting is over, remove all the chipped out portions.
- Now your basket on thermocol is ready. Keep it aside.
- Take your hard board. Cover it with the black or any dark colour cloth. Cover it properly and stretch out or bring the four sides to the back side of the hardboard and paste them to the board using glue( Fevicol).
- Your hard board should be of appropriate size, so that your thermocol design can be properly stuck to the board.
- Now paste the cut thermocol basket on the hardboard. Then take the sola wood. Press it slightly without pressure so as to make it smooth. Please do not press it hard, so that it becomes too flimsy. Now you have to do the 'weaving' design on the thermocol basket.
To make the Basket : Cut the sola wood into strips of even length and width say, approximately 2cm x 2cms. Each piece can be stuck on the design of the basket lengthwise and breadth wise.
Another method of making a basket : To weave the design of the basket :- Cut the sola wood into strips of even length. Paste the strips at the top edge and side of the basket and leave it loose and weave alternately. After weaving, paste the edges to the thermocol and chop excess sola wood pieces. Sides of the basket should be covered neatly with the sola wood. Now the basket is ready.
To make the Roses:- Cut the sola wood in the shape of petals. Cut the petals of 3 different sizes approximately 200 -300 in nos.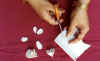
Take a small petal. Roll it and tie it at the bottom with the flower making thread. Arrange 5-7 petals around it and again tie with the thread. Now the flower is ready.
Make around 50-60 flowers of different sizes. Since the solawood is fragile, care should be taken while tying with the thread.
To make Leaf:- Carefully cut and shape 20-30 leaves with the sola wood. 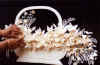
First arrange the flowers and leaves on the top portion , just above the basket. Once you are satisfied with the arrangement, paste them onto the positions using glue (fevicol).
Arrangement and pasting should be done in such a manner that it should look as if the flowers are arranged from within the basket.
I found this tutorials in the net,Hope it will be usefull to you all.For more tutorials click here
Sunday, August 16, 2009
HOW TO USE CRACKLE MEDIUM
CRACKLE MEDIUM IS A TRANSPARENT MEDIUM WHICH GIVES A CRACKED EFFECT OR ANTIQUE EFFECT TO YOUR PAINTING.YOU CAN USE THIS CRACK EFFECT AS THE BACKGROUND FOR YOUR PAINTING,OR WHILE PAINTING A TREE OR SAND PORTIONS OR WATER OR ANYTHING TO GIVE A ROUGH TEXTURE.YOU CAN USE THIS MEDIUM IN SURFACES LIKE GLASS,PLYWOODS,POT ETC. THIS WILL BE VERY INTERESTING TOO,..SO LETS SEE HOW TO USE IT.
- TAKE ANY TWO CONTRAST SHADES OF FABRIC PAINTS,SAY BROWM AND YELLOW
- FIRST APPLY A COAT OF YELLOW COLOUR AS THE BASE.LET IT DRY FOR 5 MINS
- THEN TAKE THE CRACKLE MEDIUM IN A PLATE,APLLY A THICK COAT OVER THE YELLOW COLOUR WITH FLAT BRUSH,LET IT DRY FOR 10 TO 15 MINS.
- WHILE IT'S SEMI DRY,TAKE BROWM COLOUR IN A PLATE MIX IT WITH WATER AND DILUTE THE PAINT AND THEN APPLY IT WITH A FLAT BRUSH OVER THE CRACKLE MEDIUM.
- AFTER 5 MINS,THE PAINT WILL START CRACKING.LEAVE IT TO DRY FOR TWO HOURS.AFTER THAT YOU CAN DECORATE IT WITH ANY THING,LIKE YOU CAN STICK SOME PICS AND DO DECOUPAGE WORK ON TO IT.
- THE DRECTION OF THE SECOND LAYER OF THE PAINT MATTERS.IN WHICH DIRECTION YOU APPLY THE SECOND COAT,YOU WILL GET THE CRACKS ACCORDING TO THAT.(SO NO NEED TO WORRY ABOUT THE BASE COAT AND CRACKLE MEDIUM COATING)
- YOU CAN USE SPONGE INSTEAD OF BRUSH TO APPLY THE SECOND COLOUR,TO GET DOTTED CRACKS.(YOU CAN USE THIS TECHNIQUES FOR PAINTING A SAND PART OR WATEr.
Saturday, August 8, 2009


Tuesday, August 4, 2009

Sunday, August 2, 2009


Subscribe to:
Posts (Atom)